Personal Account
Personal account is a component of the Nemo.Travel online reservation system which stores information about your orders, messages, finances and other data.
Содержание
Purpose
Personal account page helps managing and keeping orders under control, track various order queues, search for orders, upload to files for reporting, create tourist profiles, track, receive and send messages/claims, view personal account information, change profile information (of your user and company) etc.
Work principle
To enter your personal account, click on the Personal account above thу search form.
Personal account consists of the following sections:
- Bookings
- Ticket exchange & return
- Messages
- Inquiries
- Finances
- My profile
- Company profile
- Pessengers’ profiles
Bookings
The section contains a table of orders with tools for searching, grouping, filtering, etc.
The table displays the orders belonging to the user (agency / sub-agency) selected in the User field. In the Nemo.Travel system, different user types have different rights:
- Users have access only to their bookings.
- The manager sees the orders of the entire agency: all users, groups and companies of the agency.
- The root agency expert sees all the agency’s orders (users, agency’s subagents, and agency’s subagent users).
- The expert of the company sees all the orders of his company.
To view the order table of another object (user / group / company), click on the Edit button next to the field. To view all bookings of any registered user of the agency (user group, company) by the manager (expert), click in the header of the form click Select, then select the user of interest to us in the pop-up window. While viewing orders of a user group, only user orders are visible, which are located in the root of this group.
If the group also contains companies and nested groups, the orders of users of these companies and groups are not included in the selection by the root group.
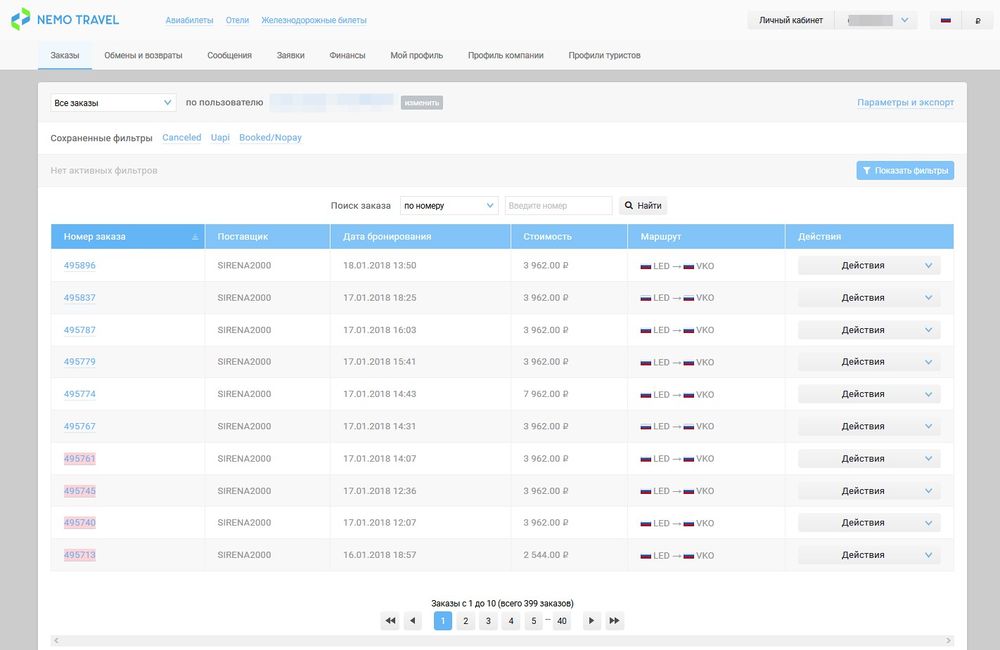
Bookings are displayed as a table.
- Table rows - bookings.
- Table columns - parameters of the bookings.
|
| Table of bookings |
The set of displayed columns in the table can be changed. To do this, click on the Options and Export button and select the columns necessary for displaying with the flags.
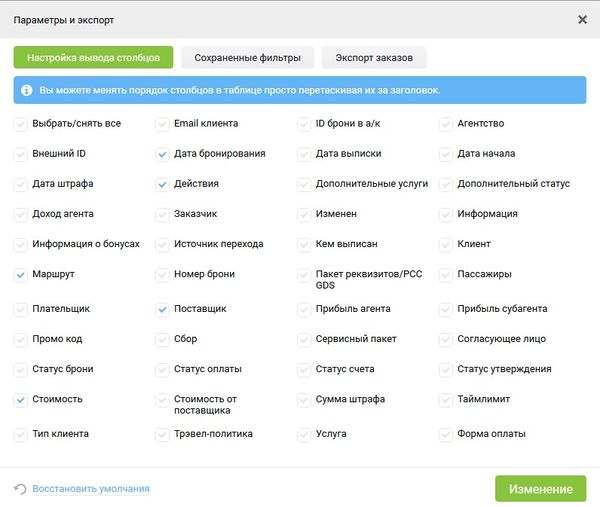
|
| Customize column output |
In the Order display settings section (section address: 'agencydomain/settings__po_settings) you can preset a set of columns that will be displayed in the order table of different user groups.
Attention! The VOID mark in the Ticketing date column is indicated if there are currently inactive tickets in the order.
Order export
To upload the table data in XML formats for the further creation of management reporting, click on the link Settings and export, a new window will open, tehn click on the Order exportand you will switch to the tab on which you can export orders to XML, XLS or XLSX file format.

|
| Order Export Tab |
- Orders are uploaded based on the applied filter parameters.
- Orders for the selected user/company and their subagents/users are uploaded.
- Request for uploading order data is displayed in the logging system with an XML file containing the upload data.
- To export pending orders in XLS(X) format, in the order filters, set the Booking Status parameter to Pending.
- Limit on the number of simultaneously uploaded orders: 1000.
- If you need to upload a large number of orders to get complete statistics for all orders, break the upload by periods.
Sorting bookings
By default, bookings are sorted by creation date (newer ones on top), to sort bookings by another column, click on its name - bookings are sorted by this parameter in ascending booking. If you click on the column name again, bookings are sorted by this parameter in descending booking.
Booking search
To find an booking by identifier in the field Search booking:
- select ID type
- by number - the booking number assigned by Nemo.Travel,
- Locator - the booking number (PNR) assigned by the service provider,
- by passenger - the passenger's last name in the PNR (for example, search by the name of the first passenger),
- by ticket number - ticket number in the PNR (only for issued bookings),
- by customer - user number or first letters of the last name of the contact person who placed the booking in Nemo.Travel. Used with the type of customer form - “B2C: user data”.
- by external id - identifier assigned by the external accounting system.
- by email - email in the booking.
- by phone number - the phone number in the booking.
- by bonus card - bonus card in the booking.
- Next, enter the identifier in the field to the right of the identifier type and click Find.
Tracking bookings with expiring time limit
To track bookings with expiring time limit, the table contains the bookings whose time limit for payment expires in the near future:
- If the booking number is highlighted red — booking time limit in less than 6 hours.
- If the booking number is highlighted yellow — booking time limit expires in less than 12, but in more than 6 hours.
When you hover the cursor over the booking number, a tooltip appears. Thanks to this feature, agency staff will be able to track such bookings more quickly.
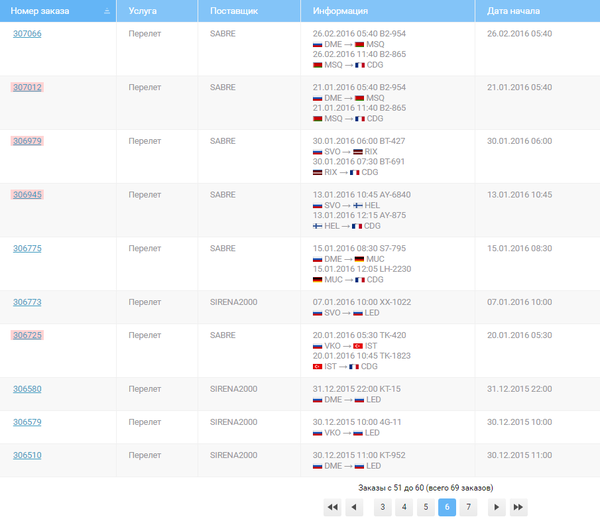
|
| Tracking bookings with expiring time limit |
Внимание! If the user is deleted, access to his bookings through the personal account is closed to any user, including the manager.
Booking queues
Booking queues are available to managers and experts of the agency. Select the type of bookings to display above the table in the drop-down list.
- All bookings — in this tab, all bookings for the selected user will be displayed.
- All problem bookings — for all bookings in which problems or errors are recorded, for example, while booking or ticketing.
- Synchronization issues — bookings with synchronization problems, for example, status mismatch in Nemo.Travel and GDS.
- Pending booking data — bookings for which it is necessary to add lacking data (passport data, visas, etc.).
- Export issues — bookings that were issued in Nemo.Travel, but the ticketing data was not transferred to an external system, for example 1C.
- Manual status — bookings for which the status has been manually changed.
- Modified while synchronizing — bookings with changes after synchronization with GDS.
- Fixed price — for unpaid bookings with a fixed price.
- Important orders — bookings worth more than $1,500 (paid in whole or in part), as well as bookings with business and first class flights.
- With service packages — bookings with service packages.
- Corporate approvements — bookings that require confirmation are used in the Corporate Block component.
- With extra services — bookings with additional services (Alfastrakhovanie, Aeroexpress, ERV-insurance).
- With an additional status — bookings issued with unconfirmed payment.
- Seats are released after ticketing — issued bookings from GDS Sirena with unconfirmed/invalid segments.
Booking filter
The manager and expert of the agency, as well as the system administrator, can use the convenient tool to filter bookings for search: click Show filters, then set the necessary filtering parameters and click Apply filter.
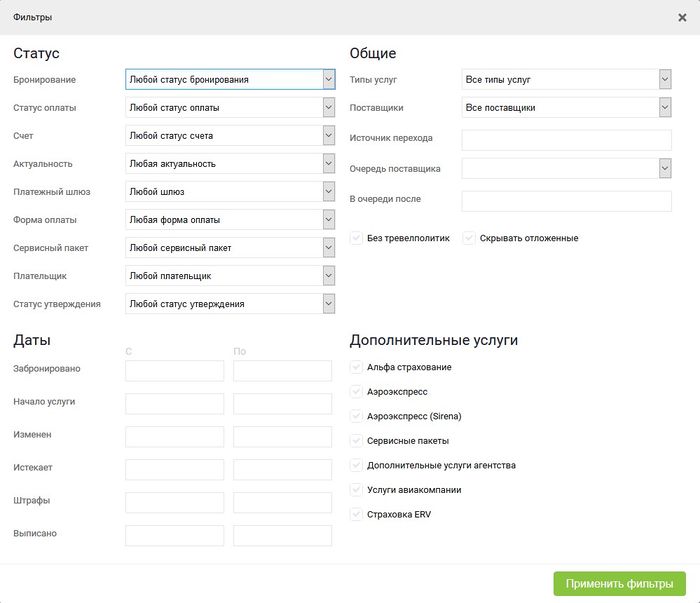
|
| Booking filter |
On the "Orders" page, you will see a table already sorted according to the selected filters. On the page, you can see all the filters that are currently applied:

|
| Filters currently applied to orders |
The excess active filter is discarded by clicking on the cross. There is a Save button next to the applied filters. Click on it to save the current set of active filters. A template with the entered name will be created.
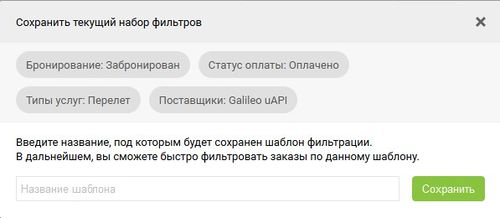
|
| Saving the template |
Next, having created a number of templates with the required filters, it will be possible to switch between them as needed. This can be done by clicking on the template name in the Saved filters line which is above the table with the bookings.
To delete an unnecessary template, click on the Settings and export link, a window will open, select Saved filters, click on the cross next to the name of the template to delete it.

|
| Deleting the template |
Filtering parameters
| Name | Description |
|---|---|
| Status | |
| Booking | Order status:
|
| Payment | Select the payment status from the drop-down list:
|
| Invoice | Select the status from the drop-down list:
|
| Relevance | Select the relevance from the drop-down list:
|
| Payment gateway | Filters orders by the payment gateway used to pay. Select a payment gateway from the drop-down list. |
| Payment method | Filters orders by payment method. Select the payment method from the drop-down list. |
| Service package | Filters orders by the name of the service package included in them. Select a service package from the drop-down list of packages started by the agency. |
| Payer | Select a payer from the drop-down list. |
| Approval status | Select approval status from the drop-down list.
|
| General | |
| Service type | Select a type of service from the drop-down list:
|
| GDS | Select GDS from the drop-down list. |
| Referring source | Transition source of the metric module. Enter the identifier of the transition source or its name in the field. Attention! The filter is available only if the module Interaction with metasearch engines is enabled. |
| Hide pending bookings option | The option hides orders that have not been booked. |
| Without travel policies option | |
| Dates | |
| Booked | Select a date range to display bookings made in that period. |
| Start | Select a date range to display orders with departure during this period. |
| Modified | Select a date range to display the orders last modified during this period. |
| Expires | Select a date range to display orders with the payment time limit for during this period. |
| Penalties | Select a date range to display orders that incur penalties during this period. |
| Ticketed | Select a date range to display orders issued during this period. |
| Additional services
Block for order filtering by the type of additional services included in them. The filter works according to the operation principle of the logical element OR: if you select Alpha insurance and Aeroexpress, the orders that include at least one of the selected services will be included in the results. | |
| AlfaInsurance | Choose an additional service. |
| Aeroexpress | |
| Aeroexpress (Sirena) | |
| Service packages | |
| Extra services of agency | |
| Carrier services | |
| ERV insurance | |
Ticket exchange & return
The section represents all the inquiries for exchange and refund available from the agency. Access to this section is available to all registered users of the system.
The section contains a table of inquiries for exchanges and returns, which by default contains the following columns:
- inquiry id - the number assigned to the inquiry when it is created.
- inquiry type - there can be several types of inquiries (inquiry for exchange, for full and partial refund).
- orders related to the inquiry - lists all order numbers associated with this inquiry, including the order number created after the reservation was imported.
- inquiry status - there are several types of statuses (awaiting processing, accepted for work, calculation of charges, application completed or rejected).
- time before departure - time before the departure of the segment. If there are several segments it shows the time until the departure of the first incomplete one.
- requisite package - requisite package that was used when making the main order.
- booking number - supplier order ID (aka PNR).
- last change time - shows how many hours have passed since the last inquiry change.
- processing expert - the manager or expert of the root agency responsible for the action on the application.
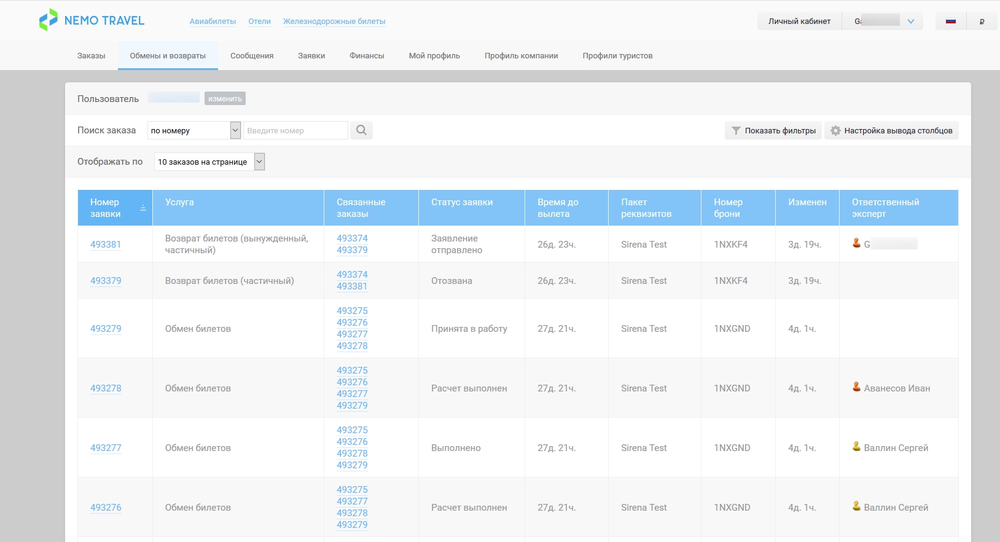
|
| Inquiry table |
Depending on the time before departure or on whether the inquiry is completed or not, the color of the inquiry may be blue or red. The inquiry is marked red if one of the following conditions is met:
- The inquiry arrived less than 24 hours before departure.
- The inquiry turns red 24 hours before the departure time of the next, incomplete segment (if there are several segments, provided that all previous ones are completed).
In other cases, the application will not be red, including if the application has arrived after all segments have been completed. After being completed, inquiries turn blue.
Filters in exchange and return inquiries
Filters can also be applied to exchange and return inquiries.
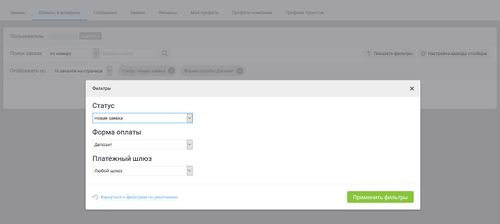
|
| Filters on the "Ticket exchange and return" page |
Filtering parameters in exchange and return inquiries
| Name | Description |
|---|---|
| Status | Inquiry status:
|
| Payment method | Filters requests by the payment gateway used for additional payment. Select a payment gateway from the drop-down list. |
| Payment gateway | Filters applications by payment type. Select a payment type from the drop-down list. |
Messages
In addition to e-mail and SMS notifications, Nemo.Travel has a message module in the user's personal account. In the Messages section, notifications are stored and created that are received by the personal account of the user/agency. To configure events for which messages are sent to your account, see the article System messages (english version pending).
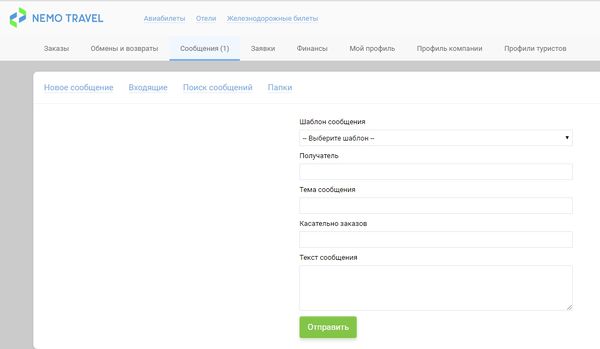
Creating messages
To create a message:
- Go to New message tab.
- Enter the order number in the For bookings field.
- In the Templates field you can select an event (optional). After this, the form fields are filled with template text with variables.
- Enter Subject.
- Enter Text.
- Add recepient(s).
- Press the Send button.
Inbox
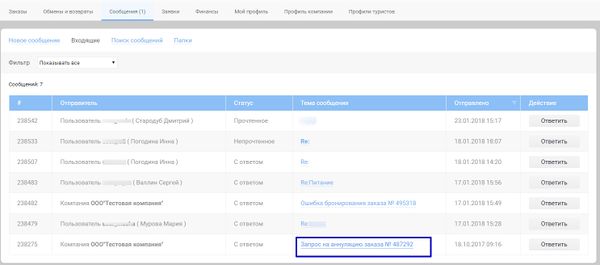
In the Inbox tab, the agency manager and agency expert can view the agency/sub-agency message table. An expert of a sub-agency can see messages only within his company. By clicking on the subject of a message, you can go to the message page and see the history of the message exchange on this topic. On the message page, you can see:
- Full name of sender;
- Sender email;
- Sender phone;
- Sender company;
- Message recipient;
- Message status;
On the message page, the user can reply to the message in the "Quick reply" or "Go to the full form" to reply to the message.
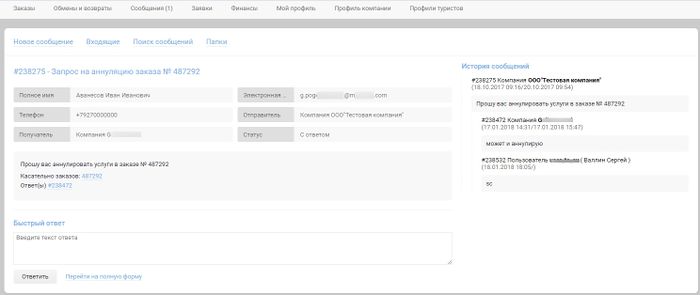
|
| Message page and its history |
Find a message
In the "Find a message" tab, the user of a personal account can search among messages addressed to him or his agency by:
- The folder in which this message is located;
- Message subject;
- Order number;
- Last messages by 7 days;
- Unread messages.
Message folders
When clicking on the By bookings link, the user is redirected to the Inquiries section of the personal account.
In the Messages → Directories → By bookings section, only letters concerning orders are displayed, i.e. letters with the indicated order numbers. P.S. If the user writes a letter from the order information page, the field is filled in automatically.
In the Messages → Directories → Agency messages section, agency manager and expert can see all agency messages. The manager and expert of the sub-agency can see messages only within his company.
Inquiries
This section contains booking requests, cancellations, etc.
For example, if no flights were found by the user's request, user can leave a booking request that is then transfered to the agency’s personal account as a message in the "Inquiries" section and/or as an E-mail notification (see notification (russian version in progress).
Finances
Section for accounting personal accounts of B2B clients. Available to managers and experts of agencies (sub-agencies), but not available to users. The section consists of two tabs:
- Current balance status — contains information about the company, its personal account and credit limit,
- Transactions logs — history of changing, replenishing and writing off funds from the personal account of the company in reverse chronological order.
The manager and the expert of the agency can view all personal accounts of his sub-agencies. The sub-agency manager only sees the balance of his agency.
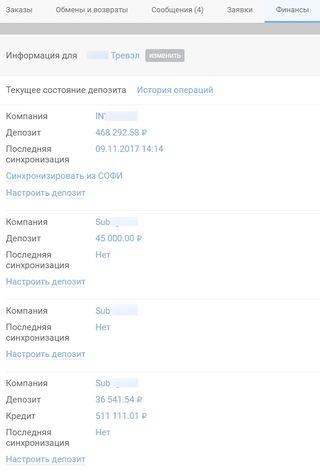 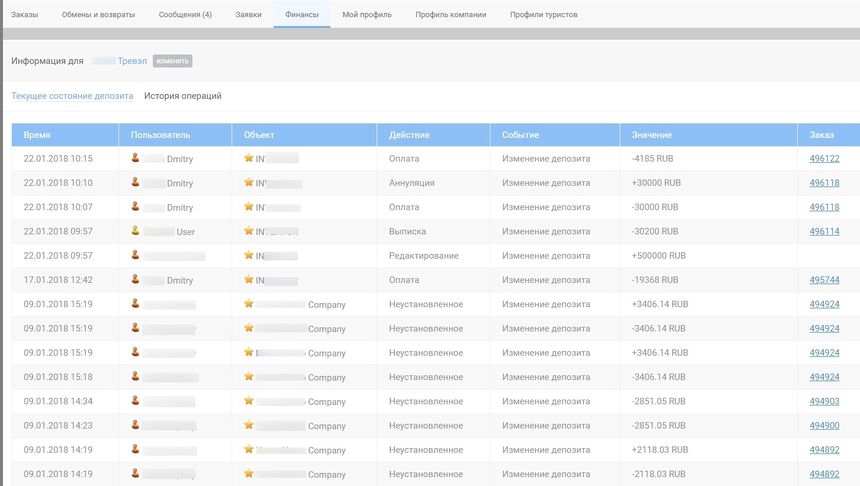
|
| Display of personal accounts of subagencies and History of operations on personal accounts of subagencies |
My profile
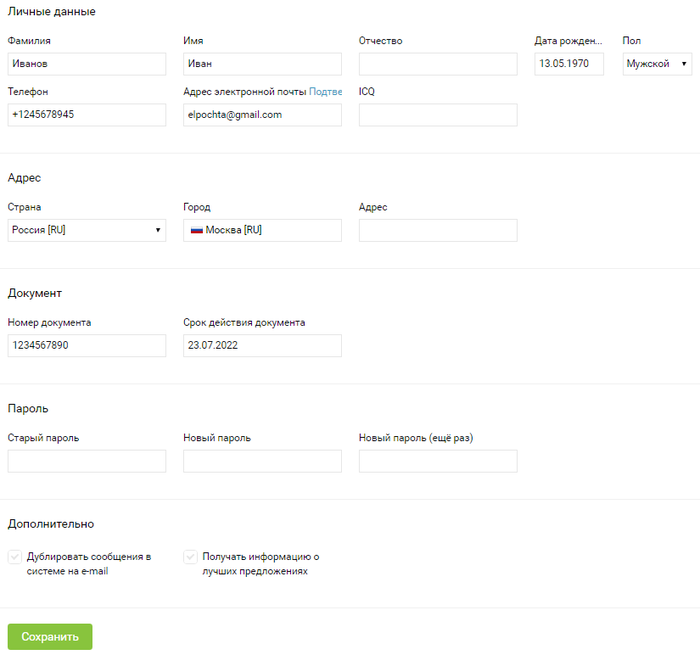
Personal data settings of the user who owns the account. You can also change the manager’s personal data in the settings of the administration panel. To upload the information from My profile to the booking form, set the parameter Pre-filled passengers and client data in the For technical support → Outdated settings → Booking settings section. (see Booking).
|
| My profile section |
Company profile
Company profile settings.
- Agency manager can view agency settings in this section.
- The subagency manager in the section can view subagency data.
These settings are also available in the settings of the administration panel.

|
| Company profile section |
The agency address displays the actual company address specified in the administration panel
Passenger profiles
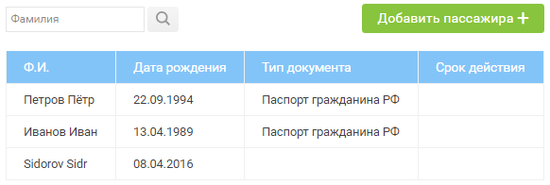
Passenger profiles section remembers and stores information about all your tourists to quick fill in the "Passengers" block on the booking form. When a user issues a ticket and indicates a new passenger in it, passenger data is automatically stored in the "Passenger profiles" of this user.
|
| Passenger profiles section |
The user can add a profile of new passengers on their own.
To add a new passenger to the list, click the Add Passenger button.
Required fields —
Given name и Surname.
Optional fields to fill in:
- Patronymic;
- Specific meal;
- Date of birth;
- Gender;
- Nationality;
- Email;
- Document type;
- Document number;
- Expiry date;
- Airline:
- Loyalty card number.
In this section, you can search for a profile by the name of the passenger.
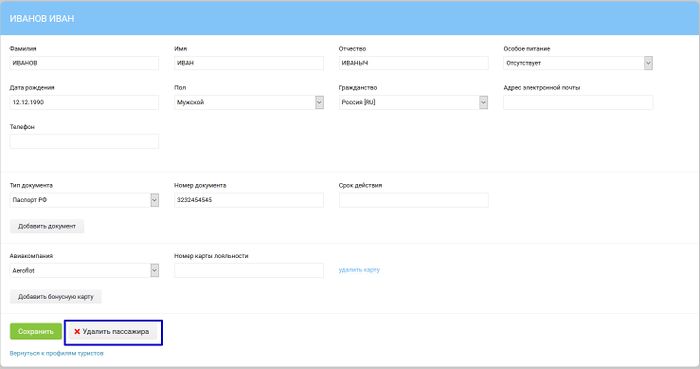
Profiles can be edited and deleted.
|
| Deleting a tourist profile |
For a single passenger, you can add several documents of various types. It will be possible to select the required document on the booking form in the Document type field, after selecting the passenger, all his documents will become available for selection.
On the booking form, the user can select all his passengers from the "Passenger profiles" in the drop-down list. The drop-down list can be opened both in the Surname field and in the Given name field. Passengers available for selection are filtered by age from oldest to youngest.

|
| Passenger selection on the booking form |
Differences in passenger profiles
Внимание! There are differences when working with the Avia module and the Railway module Nemo.Travel:
- When working with the Avia module, passengers from the passenger profiles in the Personal Account are used.
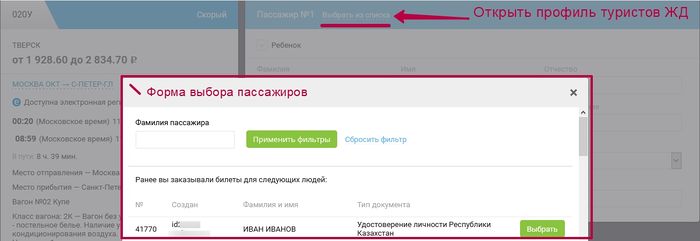
- When working with the Railway module, passengers from the passenger profiles (created in the Personal Account) are not available. Each passenger for whom the railway order was issued is automatically added to the passenger profile of the Railway module. Adding passengers independently is not provided.
At the next creation of the railway order, on the booking form, the user of the Nemo.Travel system can select a passenger from the passenger profiles of the Railway module. See the picture "Passenger profile of the Railway module".
|
| Passenger profile of the Railway module |
See also
- Orders (English version pending)
- Booking
- Cancellation (English version pending)
- Itinerary receipt (English version pending)
- Website (English version pending)
- Authorised user (English version pending)
- Guest user (English version pending)
- Agency manager (English version pending)
- Booking expert (English version pending)
- Queue (English version pending)
